Friday, 22 October 2010

final renders.....for now

These are the final renders that i am handing in. they are not quite finished as i still need to do the bump mapping, the specular mapping and animating it but unfortunately due to problems i have had at various different points where Ive struggled to and spent to much time on getting different parts right i have run out of time before the hand in. I will however still do these parts and hand them in later as well. apart from not being able to get this done in time i have learnt a lot about using 3DMax and Photoshop doing this project especially about more of the different tools that can be used one both of the programs like for example the patch tool on photoshop and the Unwrap UVW tool on 3DMax. overall i am pleased with the look of my model and glad it has come out as well as it has.


skin map finished and applied


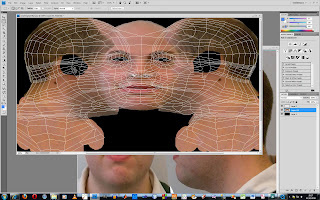
This is my finished skin map i kept making little touches as explained in a previous entry and continually adding new parts as needed and blending the tones of the face to make them match and also pasting a dark enough skin colour onto the ear sections so they would match the surrounding area. also had to line up the hair so it flowed right on the head and i had to keep moving around the eyes, nose and lips until they matched the right places on the model of my head. when this was all done and lined up it was put into 3DMax as a material and droped onto my head as can be seen in the screenshot below:

eye texture


this is the eye texture map i created and used on my eyes on my head. this was made simply by using the gradient editing tool on one layer going from dark brown to a lighter brown to white and then on a higher level use another gradient going from back to transparent. this was then brought into 3dmax as a material and dropped onto the spheres used as eyes.

Thursday, 21 October 2010

Texture painting


the texture painting is now just about finished i did this in photoshop using the mapping mentioned in the previous entry which i rendered and saved as a jpeg to use for this purpose. what i did next was to use the original reference pictures that were taken and started picking sections, like for example the forehead and nose and stuff, cutting them out of the photos and pasting them onto the guide map in an attempt at making a flat picture of the front and both sides of my face for fitting onto the head model to give it some texture. after i had spliced the different parts of the photos onto the painting i had to flatten the image and use the patch tools and the clone stamp tool to blend in the lines and the different tones across the face. now this is done the next step is to put it onto the head and see how well it fits and make changes as needed to get the best fit possible.


mapping out the face cont.


the next stage for mapping out the face was to do the ear which was done in much the same way as the head except that instead of using the cylindrical map parameter i had to use the planar one and then the pelt one as well though the pelt map parameter didnt really work for me as the checker pattern was already lined up pretty well. after this was done i had to put in another unwrap UVW above the symmetry modifyier which did the same for the second half of the head as what i had done with the first and allowed me to position it and attach it as shown above. after this was done i had to attach both sides of the face to the other welding the vertices where they meet. then i used the select overlap tool to find the over lapping polys and pull them around until they were no longer overlapping. the sections above which are highlighted in red are sections i could not stop from overlapping the rest was done with alot of work!

Wednesday, 20 October 2010

Mapping out the face


In preperation for putting the skin on my head i had to use a tool called unwrap UVW. this was done by first selecting every poly other then the ones in my ear, as this will be done differently, and putting on the unwrap UVW modifier and then aligning the box that came up so it completely surrounded the selected polys. after this i put a checker material on the head so i could see any trouble areas which were shown by the checkers being streached. then using the edit button under parameters i brought up the box shown in the screenshot above. i used this box and the relax tool within to isolate the trouble areas and sort out any of the stretched checkers until i had a nice smooth mesh surrounding all of the head like so:

Tuesday, 19 October 2010

lips and eyes


the eyes and lips are now done. the lips were done by grabbing the edges of the mouth and shift dragging the edges to create more polys this was done a few times so enough polys were created to give definition to the lips with the innermost row going back into the mouth to give the impression of them folding back.
the eyes were done by creating a sphere which was placed in the right position in the head and then moving the vertices's of the eye lids around until they looked right.

Attaching the ear

the next stage was to attach the ear to the head. this was done by first removing the polys on the head that were where the ear was to be placed. then i had to match up the edge vertices's of the ear to the vertices's of the head where the polys had been deleted this was made easier by using the snap function but still took a bit of time when this was done all that was left was to attach then weld the ear vertices's to the head vertices's.

modeling the ear

the ear was modeled in much the same way as the face was first by redrawing out the polys in 3d max then pulling out the vertices's until they match the layout of the ear. once this was done the ear canal and the fold in the top of the ear needed to be made this was done by selecting the edges that were to be affected and using the Chamfer tool to create additional polys which i dragged back and moved about until they looked right.

ear topography

in making the ear getting the topography of it is very important so to get it right i went back into photoshop with the reference pictures and repeated the first steps i made with the face. these were to first map out all the key features of the ear and then using these key features begin to draw in quads making sure they all flow together nicely.

Monday, 18 October 2010

attaching the face to the head


the whole thing is now one shape this was done by first aligning all of the vertices's from the head to the ones on the face adding new polys with the cut tool as needed so they all match up exactly. when this was done i used the attach tool to connect them both and the turbo smooth to see how it looked i then kept putting finishing touches to it trying to make it look a lot neater and kept pulling about the vertices's until i was happy. next will be the lips and ears.

back of the head and shoulders


Ive created the back of my head and my sholders now by first making a sphere which i lined up with the shape of my head and squashed down so it was a similar shape then deleted all the polys i didn't need which were all but the ones going over the top and round to the back of my neck and some round the side of my head.
i used the shape that was left and extruded edges of the polys so they matched the contours of the head. once this was done i then extended it down into my neck and shoulders extruding more and more polys until it had the right sort of shape i then added a turbo smooth to see how it looked and added some refining touches until it looked how i wanted it. this was a long process and I'm still not happy with how it came out and given more time i would of kept going until it was a lot better.

Friday, 15 October 2010

picking the nose

to do the nose i first had to select all the edges round the outside of the nostril and turn them into new polys then using the connect tool i split these polys in two leaving a gap in the middle. using these new vertexes i crafted the edges of the nostrils until they looked right. Finally i used the create tool to fill the gaps where the nostrils would be and the extrude tool to move these polys up to create the effect of a nostril cavity.

Smoothing the wrinkles

before smoothing i used the mirror tool on the half of the face i had done to complete the face. though because this second half is a clone any change i make to the first half will be copied on the second. when this was done a pinching effect was evident down the middle of the face which i had to fix by moving some of the vertexes. after this was done i added a turbo smooth to the whole thing to give the effect as seen in the screen shot.

Wednesday, 6 October 2010

adding depth

I've now added depth to the face grid i made and posted about earlier. this was done by using both the front and the left view of the face. i used the front view to select the vertex i wanted to move and the side view to pull it out so it matches the contours on the picture of the side of my face. this was done with every vertex untill it matched as close as possible.

Tedious polys

the grid is now done! to do it i used the line tool to draw a line in 3d max over every line i drew in photoshop outlining each quad turning each one into a polygon. After these lines were all drawn out i converted one of the polys into a editable poly and then attached all the other lines i had drawn to give the effect seen in the attached picture. now this is done i can now get to giving the face some depth.