Thursday 2 December 2010

Materials

Ive done the materials for two of the three parts im doing the dining room was done by searching for textures, darkwood for the table and chairs, carpet for the floor and wallpaper for the walls. also another material still needs to be found for the door. the next stage is to do the material for the jam jar and then insert a camera.


For the balloons scene i did the same for the ground i found a grass texture which i put on. but for the balloons themselves i created the designs in photoshop using a mixture of the rectangle tool and the smudge tool i then imported these into max and put them on the balloons. i also created a sky light so some of the surrounding area could be seen i gave it a fairly dark texture though because this scene takes place at night. the next stage is to animate them and put in cameras.


Apart from these two i still have to take apart referance photos of the nursery rhyme house to finish the material for that scene and again put in the camera.

Head done now for the group work.

i have been assigned two scenes for our group animation, the hot air balloon scene and the house scene both outside and inside, i have just finished the modeling for these as shown:


to the left is the nursery rhyme house we are including i did this by making different boxes and using the extrude tool and by manipulating the vertices. next for this i need to make the materials that will be used to make the house look more like it does in real life.


This is the scene with the hot air balloons i did this in much the same way as the house above. i also added in omni lights which give them a glow from inside which looks like the flamer is being fired. i changed the lights colour to orange and made it an ambient light but limited the reach the light had. again the next stage of this will be to create the materials.


This is the final part of the nursery rhyme house from the inside i modeled the table, chairs, jam jar and the plate with the toast in the same way described above. although to smooth the legs of the table i used the MSmooth tool so the legs smoothed out but the table top stayed as it was which wouldn't of worked using turbo smooth. Again the next stage will be to create materials for everything.

Friday 22 October 2010

final renders.....for now

These are the final renders that i am handing in. they are not quite finished as i still need to do the bump mapping, the specular mapping and animating it but unfortunately due to problems i have had at various different points where Ive struggled to and spent to much time on getting different parts right i have run out of time before the hand in. I will however still do these parts and hand them in later as well. apart from not being able to get this done in time i have learnt a lot about using 3DMax and Photoshop doing this project especially about more of the different tools that can be used one both of the programs like for example the patch tool on photoshop and the Unwrap UVW tool on 3DMax. overall i am pleased with the look of my model and glad it has come out as well as it has.


skin map finished and applied


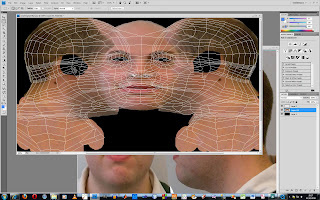
This is my finished skin map i kept making little touches as explained in a previous entry and continually adding new parts as needed and blending the tones of the face to make them match and also pasting a dark enough skin colour onto the ear sections so they would match the surrounding area. also had to line up the hair so it flowed right on the head and i had to keep moving around the eyes, nose and lips until they matched the right places on the model of my head. when this was all done and lined up it was put into 3DMax as a material and droped onto my head as can be seen in the screenshot below:

eye texture


this is the eye texture map i created and used on my eyes on my head. this was made simply by using the gradient editing tool on one layer going from dark brown to a lighter brown to white and then on a higher level use another gradient going from back to transparent. this was then brought into 3dmax as a material and dropped onto the spheres used as eyes.

Thursday 21 October 2010

Texture painting


the texture painting is now just about finished i did this in photoshop using the mapping mentioned in the previous entry which i rendered and saved as a jpeg to use for this purpose. what i did next was to use the original reference pictures that were taken and started picking sections, like for example the forehead and nose and stuff, cutting them out of the photos and pasting them onto the guide map in an attempt at making a flat picture of the front and both sides of my face for fitting onto the head model to give it some texture. after i had spliced the different parts of the photos onto the painting i had to flatten the image and use the patch tools and the clone stamp tool to blend in the lines and the different tones across the face. now this is done the next step is to put it onto the head and see how well it fits and make changes as needed to get the best fit possible.


mapping out the face cont.


the next stage for mapping out the face was to do the ear which was done in much the same way as the head except that instead of using the cylindrical map parameter i had to use the planar one and then the pelt one as well though the pelt map parameter didnt really work for me as the checker pattern was already lined up pretty well. after this was done i had to put in another unwrap UVW above the symmetry modifyier which did the same for the second half of the head as what i had done with the first and allowed me to position it and attach it as shown above. after this was done i had to attach both sides of the face to the other welding the vertices where they meet. then i used the select overlap tool to find the over lapping polys and pull them around until they were no longer overlapping. the sections above which are highlighted in red are sections i could not stop from overlapping the rest was done with alot of work!